SCIM User Provisioning
Our platform now supports SCIM user provisioning, which automates adding of users from an existing user database like Azure Active Directory (now Entra ID). It not only transfers the users already defined, but keeps this up to date as users are added or removed from that database. When combined with SSO (Single Sign-On), it means in theory you just wouldn't have to worry about managing user login to your site.
The SCIM support in our platform allows for both users and groups to be downloaded.
In this article we'll discuss how you set up Azure AD (now Entra ID) for SCIM. The general approach should be applicable to any system that supports SCIM.
Important: Some SCIM providers (eg. Azure AD) use the email address of the user as the UserID. The SSO system in our platform creates users based on the mailbox name (cutting off the domain name). This may cause a conflict when creating users from SCIM if users are already registered for SSO. Please see the section at the end about updating User IDs to use email addresses first.
Set up SCIM Administrator User
The first thing you need to do is create (or find) a user defined in the system that is either an administrator or at least a "User Manager" as the primary role. You can learn about setting up users here.
Once you have created that user, log in as an administrator and then go to the Configuration tab. Next click on "Authentication Settings". Now click "What's Next" and select "Setup SCIM": 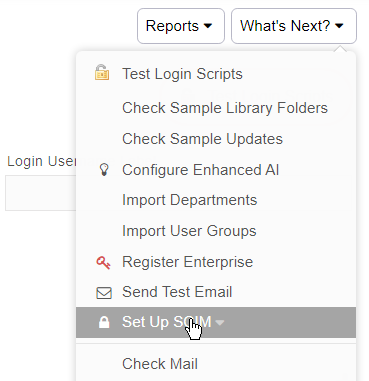
This will bring up the SCIM Configuration form. 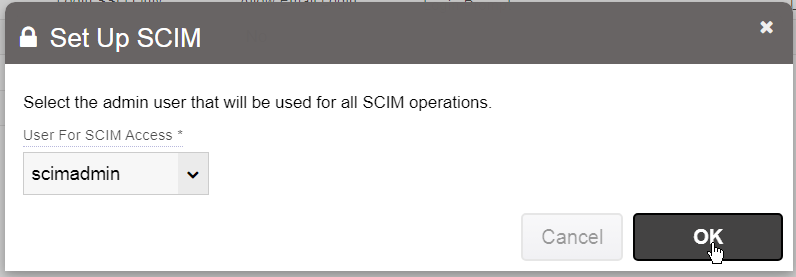
In this form you will select the SCIM administrator user you just added. This list will only show User Manager users or admins.
Once you click OK, it will provide you with a secret key. Please make a copy of that secret key and keep it secure. Note that every time you run this, any previous SCIM secret key that was issued will be voided and will no longer function. There can only be one active SCIM secret key at a time.
Now, you should set up the SCIM host. We'll go through the steps for Azure AD here.
Setting up Azure AD
Log in to the Azure portal. Click on "Entra ID". In there, click on Enterprise Applications on the left, and then add an Enterprise Application (you can call it anything). Click on "Create your own application" and select "Integrate with any other application you don't find in the gallery (Non-gallery application)".
Once it is added and you select it, click on Provisioning on the left side navigator: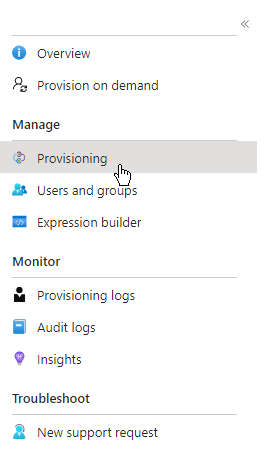
Then click "Get Started" to start setting it up. This will show a form similar to this. Select "Automatic" for the provisioning mode.

In this form, as the Tenant URL you will put the URL of your account, but append /scim on to the end.
Next, the Secret Token should be the secret key that was provided by the "Setup SCIM" in your site application. This is used to authenticate access to the system. Incidentally, if you ever believe this key has been compromised, repeat the "Setup SCIM" action again to create a new key and invalidate the previous one. It may be a good idea to perform this operation on a regular basis for security reasons.
Under "Settings" there are some other options including providing an email address to receive notifications about the progress of the SCIM syncing operation. Certainly useful to provide.
Next, click "Test Connection" to make sure it can access your system.
Then click "Save" at the top.
Monitoring SCIM Syncing
Once it shows you the provisioning status page, click "Start Provisioning" if it's not already started. Note: The syncing operation on Azure is done every 40 minutes (or thereabouts). There is no way to start it earlier, however you can manually provision users using the "Provision on demand" option, which may be a good way to test it.
Eventually, it will say "Incremental cycle completed". Any errors will be displayed in the "View Provisioning Details". 
Keep in mind that you should also receive emails from the system if there are any failures. You will need to also monitor the Users tab and the groups (in Configuration / User Groups).
Updating User IDs to Use Email Addresses
To facilitate customers moving from Active Directory to Azure AD (now called Entra ID), we have provided an action in "AD Options" in the Configuration tab called "Convert All UsersIDs To Use Email". This is because Active Directory (and SSO) uses the user name only, and Entra ID uses the user's email address as the user ID. This action will update the User ID of all users so you can then use Entra ID's SCIM support. You should run this action when the system is not busy as it will take a long time to run and will lock the database during that period. For more guidance please contact us.