Customizing
In the Standard and Enterprise editions (not Starter), there are a couple of options for customizing the incident reports.
Incident Categories
The main way to customize the incident form is by defining Incident Categories, along with a custom form for each category. This allows you to collect different information from the user based on the specific type of incident that was raised. For example, for an IT Security incident, you may to collect additional information about whether it's related to unauthorized access, a privacy or a safety issue. So in that case you would add an Incident Report Category of "IT Security" and add the fields and dropdown options you want to collect from the user in there.
You'll see the list of currently defined incident categories in the "Category" field of the Incident Report form (only available in the Standard and Enterprise Editions). 
To add a new Incident Category, you will have to be an administrator. If you are not an administrator, ask an administrator to do this for you.
Go to the Configuration tab, and click the "Custom Incident Forms" button. To add a new entry, click the "+" button on the right hand side. 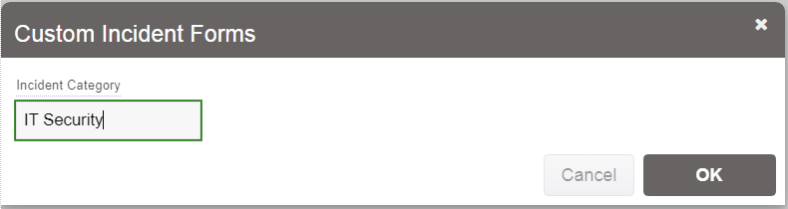
This will show the form for adding a new custom incident category. Enter in the name and then click OK. This will add a new category that will now show up in the "Category" dropdown of the Incident report.
If you then click on the new entry you have made, it will then allow you to start adding entry fields for your custom incident form. 
Once you click on the entry, click on the "+" on the right hand side of the "Form Fields" list. This will bring up a form where you can put in the details of the field you want to collect. This is similar to how you would define Checklist Forms, so please refer to that section for more details. 
Here you would typically enter in the name of the field you want to collect (which will be the internal name, used to identify the data that is stored in the future - even if the title changes), and the Title which is how it's displayed to the user. The Title can change, but the Name should never change, otherwise you will risk losing previously entered data. The Type will select the type of data you want the user to enter, which default to short text.
Again, for more details about the options in this form, please refer to the section on checklist forms.
Once you have added the fields you wish to collect, you will need to apply the changes to the system. Because this updates internal models and the database, it may take a few seconds to apply. During that time, the system will not be accessible to users (it will be unresponsive), so please ensure you won't be interrupting anybody's work. To apply the changes, click the "Apply changes" link in the blue area at the top of the screen.
Once applied and the server restarts, you can try out the new form by raising an incident report in a "test department" you can set up just for testing purposes. Simply raise an incident report, select the test department, and then select the category from the Category dropdown.
Important Note: Do not delete categories, or fields in categories, if existing data has been entered in those categories or fields. Doing so will result in the loss of data previously entered. Instead you should edit the field and mark it as "Hidden". If you want a category to not be used anymore, change the name of the category to include a "(DO NOT USE)" suffix.
Main Incident Form Customization
In the Enterprise edition, you can also customize the main incident report form, to either add your own fields or hide non-essential fields from the existing form. These are the fields that are displayed in every incident report, regardless of which category is selected.
Please read the section on Form Customization to learn how to do this.