Wiki Markup
Certain codes can be entered into the editor when editing an article that, once published, will add information or formatting changes to the article.
You can access some of these through the format button in the toolbar when editing. Click on the "Insert Special" option in that menu: 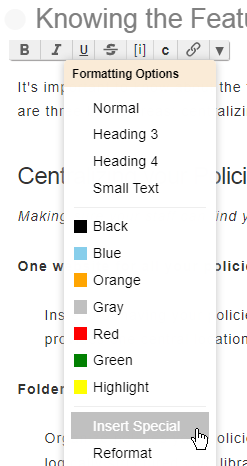
In the pop-up form, you can then select from some of the special commands available. Once you select the option, a description of the feature will display below it. You can currently add Index (which inserts an alphabetical index of all articles in the system), Revision List (which inserts a table of all changes for that article), or Approver List (which will be replaced with a list of approvers for that article).
The Revision List table will show collapsed by default. It will only show the initial revision. You will have to click the "Show More" link to expand the table. It will include both revisions and any policy reviews. It will look similar to this: 
The "Assignments" option (can also be inserted as) will be replaced with a list of all the assignments for the current user, grouped by the type of assignment. This is discussed more in the section on the End User Dashboard.
Smart Linking with Double Square Brackets [[text]]
Overview
Your editor includes a powerful and convenient feature for creating smart links using a simple markdown-style syntax: double square brackets.
By typing [[Some Title]] while editing, you can quickly create internal links to related content—either within the same article or across the system—without needing to manually locate or insert URLs.
This not only speeds up the linking process but also makes your content more portable, searchable, and structured, even as articles and headings change over time.
How It Works
When you type [[Some Text]] in the editor, the system automatically turns it into a clickable link that behaves according to the following priority:
- Heading in the Same Article:
If there's a heading in the current article (e.g., Some Text), the link will point directly to that section—making this an ideal way to create a table of contents or intra-page navigation. - Another Article with That Title:
If no heading is found, the system looks for an article elsewhere in the system that has the exact title “Some Text” and links to it. This creates a seamless internal wiki-style cross-reference between documents. - Fallback to Search:
If neither a heading nor an article match is found, the link will direct users to the search page, pre-filled with “Some Text” as the search query. This turns your link into a smart lookup mechanism for hard-to-remember or not-yet-created content.
Why Use This?
✅ Faster Editing Workflow
No need to manually search for the article or heading—just wrap the text in brackets and let the system figure it out.
✅ More Portable Content
Since the links are title-based and not hard-coded URLs, they continue to work even if the target article is moved or restructured.
✅ Works as You Write
You can use it even if you're not sure yet whether the target exists—it's just as useful for placeholders or content planning.
✅ Search-Enabled Linking
Even when no match is found, it still helps by running a search automatically, which makes your writing more exploratory and user-guided.
Examples
Best Practices
- Match Titles Exactly: Use consistent capitalization and punctuation to ensure successful matches.
- Avoid Special Characters: While supported, simpler phrases (e.g., [[Annual Review]] ) are more robust.
- Use for Drafting Future Content: You can link to a topic that hasn’t been written yet—once it's added with the matching title, the link will resolve automatically.
- Combine With Standard Links: You can still use traditional links where needed. [[text]] is an alternative, not a replacement.
Legacy Commands
The following cover some of the legacy wiki markup for finer control over tables and paragraphs in articles. It is recommended to use the formatting toolbar in the content editor for tables and paragraph indention.
Tables
While you can now use the toolbar to add a table directly into your article, you can also add a table to your page by using the pipe | character to delineate cells. Each table row must start with a | also. For example:
|Name|Number
|John|123 123 123
|Julie|234 234 234
|Bob|345 345 345
|Joe|456 456 456
Once committed, that text will be rendered as an actual table on the screen, like this:
| Name | Number |
| John | 123 123 123 |
| Julie | 234 234 234 |
| Bob | 345 345 345 |
| Joe | 456 456 456 |
There are no limits to how many columns you can create, however you should be mindful that it will have to fit into the maximum width of the page text.
You can merge cells by starting the cell with any number of forward-slash ( / ) signs. For example, to have 1 cell span 2 columns, you would put /Example , and that cell will have the text Example but will be the width of two columns.
You should also be able to paste tables from Word, Excel and other places. They will automatically be converted into the format above, however you may have to remove certain spaces that are inserted during the pasting process.
Indenting Paragraphs
While you can use the Indent button on the toolbar now to indent text, you can also indent a paragraph (eg. to create your own kind of indented lists) by starting the paragraph with any number of forward-slash ( / ) signs. Those symbols will cause the paragraph to be indented when the article is committed. Note, however, that this will reduce the available width of the paragraph as the right-hand margin stays the same.