Approval Workflow
Managing your content building and maintaining security and the quality of articles involves making sure that changes are properly reviewed and approved before being applied.
Permissioning can be set on any article (policy or procedure page) by specifying an Approver, which you do while editing the page. Once an approver is set, any changes to that page, or its sub-pages, will be sent to that approver to review before being committed. That means they will not be seen by other users until they are approved.
When multiple parent pages have approvers set, then all of those approvers must accept the change for it to be applied. If any one of the approvers reject the page, then it will not be applied. The article can be sent back to the author to edit and re-submit.
The 2 approval workflows for an article, when an approver is set, are:
- Policy Approval - article content updates
- Changes to Approver - addition, removal, or change to any Approver
Identifying Approvers
Knowing who all the associated approvers within an approval workflow are, before making the changes, is important.
You can find out who the approvers for an article are by clicking on the "Stats" link at the bottom of any article.

This will show a page with details of all the approvers.
Approval Process
Any article that is updated that has approvers set will need to be reviewed and approved before it will be visible to end-users. (Note: any changes made by an approver themselves will automatically be accepted by that approver). 
After the update is published, all approvers will receive an email notifying that a change request has been assigned to them. (Note: if approvers have different Approver Levels set, then only the first set of approval requests will be emailed out until they are complete).
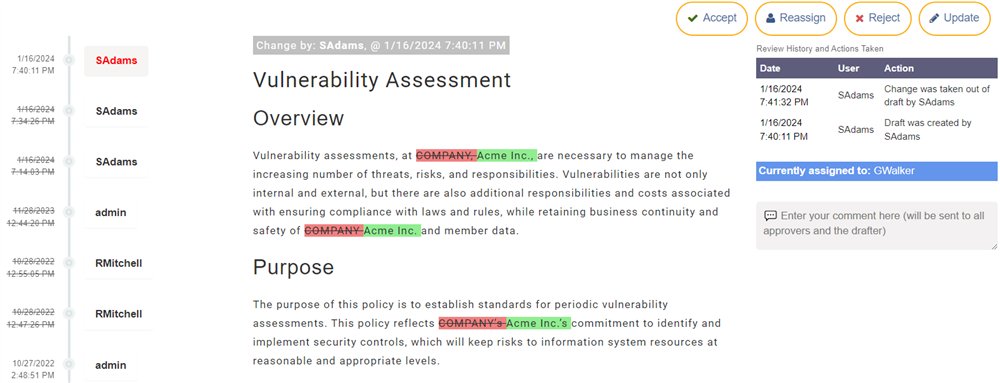
If they click the link, it will take them to a page that shows them what has changed compared to the current page. 
New text will be highlighted in green and removed text will be highlighted in red. Any additional attachments can be clicked on to review their contents.
The approver can then review what has changed and choose how to respond. If all changes are approved they would click Accept. If they don't believe it should be accepted, they would click Reject and given an explanation, which will be emailed to the person who submitted the change.
Note: When accepting a change, the user can optionally e-ink sign the approval. This signature will be recorded in the history of the change.
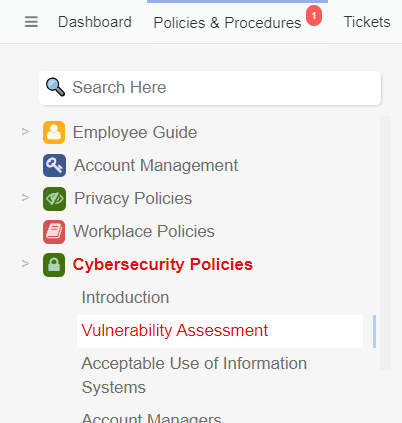
Additionally, you'll also notice that when an article is assigned to you, it will appear highlighted in red in the navigation sidebar of your site. This is to lead you to the page that you should review. 
As you click on each red-highlighted page, it will show you what's assigned in the sub-pages. You click through those pages until you get to the article that is actually assigned to you. At the top of that article it will say that changes are pending and give you a link to click to see the change request and what has changed.
The approval process may be affected by the Approver Level of the user. If that is utilized, then users from each level will be notified in groups, and it will only progress to the next level once all users at the previous level have approved.
During the approval process, you will see a chat window on the right hand side. This can be used to add comments to the article and send messages to other approvers and the original drafter of the article. This is discussed in next section.
Risk and Compliance
Also, if you are a Risk or Compliance Analyst, you will see a link at the top to any risk mitigations or compliance objectives that are related to that article. This lets you ensure that the change is not going to impact those initiatives. If you have Enhanced AI enabled, it will also use AI to evaluate the potential impact of the change. 
